Want to send us files?
Send Files
Why send files? Sometimes sending us the files you’re working on helps us answer a question or replicate a problem. You can send us your files here, even if the file would be too large to send by email (many email systems do not permit messages, including attachments, larger than 10MB).
What files should you send? For ProVal and ProAdmin, send the library files provaldd.sf, pvvip.sf, pvasmp.sf, and pvout.sf.
Do not send census data unless absolutely necessary, and when doing so, be sure to remove personally identifiable information and/or anonymize the data. If you are unsure whether census data is necessary, please call technical support at +1 203 861 5540. For ProVal PS, send the *.pvps file. For SimMetric, send the *.xsm file.
How securely are the files transmitted? As the checkbox denotes below, we mandate the use of 128-bit TLS encryption for sending files.
We recommend zipping the files using a product such as WinZip before sending.
Explore the knowledge base
If you’re having trouble getting up and running, here are a few quick fixes
Clock Error
Applies to: ProVal and ProAdmin
Symptom
A “Clock Error” message appears when trying to work in ProVal.
Solution
Contact WinTech support to receive a security code for ProVal 1-203-861-5540.
Cause
Someone at the site has an incorrectly set clock. Either another user’s clock is (or was) set in the future, or the current user’s clock is set in the past. Be sure to check the AM/PM settings.
Contact Support
ProVal/ProAdmin does not start – Windows hourglass appears and then subsequently disappears
Applies to: ProVal and ProAdmin
Symptom
ProVal fails to start. The windows hourglass appears and then subsequently disappears.
Solution
- Open an administrator command prompt and type sfc /scannow let the scan run to completion and restart your PC. The scan may not find anything wrong but may still have fixed the issue.
- An incorrect path is specified for the “SplashBitMap=”, “Initial Workspace=”, and “ADF=” settings in the [CONFIG] section of proval.ini. To remedy, remove the “Initial Workspace=” and “ADF=” lines (these were made optional starting with version 3.01), remove the invalid paths (leaving the file names), or correct the paths.
- Access to the application files may be denied due to incorrect network permissions, which may prevent ProVal from starting correctly. This is typically an issue in network installations. Access levels must be corrected to remedy this situation.
- Data Execution Prevention may prevent ProVal from executing correctly. Typically, this is the case if you run ProVal as a local administrator and yet can’t run ProVal locally. If this is the case, ProVal must be added to the list of trusted applications. To get to the settings right click on My Computer and then click on Properties. Click on the “Advanced” tab and then hit the Settings button in the “Performance” box. Now click on the Data Execution Prevention tab.
- (rare) A corrupt PVPKG.SF file. In a failed copy from the network, one user found that the pvpkg.sf file had the correct number of total bytes, but a few bytes were bad.
Contact Support
ProAdmin can’t connect to an Access database after the installation of Office 365
Applies to: ProAdmin
Symptom
When connecting to an Access database the error message “Provider cannot be found” occurs.
Solution
Download the Microsoft Access Database Engine and run a quiet installation.
- Microsoft 2016 Redistributable can be downloaded from: https://www.microsoft.com/en-us/download/details.aspx?id=54920. Earlier versions can be found at www.microsoft.com
Windows 10/11- Move the cursor to the search box in the bottom left corner and type cmd.
- Select Command Prompt (Admin)
- If the User Account Control dialog box appears, confirm that the action it displays is what you want, and then click Continue.
- At the prompt type in <file location>:\AccessDatabaseEngine.exe /quiet where <file location> is the path to where you downloaded the Microsoft Access Database Engine in step 1.
Cause
Some installations of Office 365 run in an isolated virtual environment on the local operating system and ProAdmin is unable to find the correct drivers to connect.
Contact Support
Sentinel HASP Run-time installation error during install
Applies to: ProVal and ProAdmin, v3.13 and newer
Symptom
When running the ProVal/ProAdmin installation you receive a Sentinel HASP Run-time installation error and the install is canceled.
Solution
- Look for the service called kservice.exe and if you have the service follow the steps
- Stop KService
- Install ProVal/ProAdmin
- Start Kservice
- If you do not find kservice.exe
- Open a administrator command prompt
- type netstat -ab
- look for any service that is using the port 1947
- if you find a service using 1947 stop the service
- Install ProVal/ProAdmin
- restart the service
Cause
Another application is using port 1947 required by ProVal/ProAdmin’s licensing software.
Contact Support
Network Install Setup Guide
Applies to: ProVal and ProAdmin
In network installations, users access ProVal/ProAdmin program files from a file share on the server allowing for a central location to apply updates (ProVal still runs locally). You should only use this method if you cannot push out updates using windows GPO or a third party method.
Network Install
- Ensure that all users exit ProVal. Not doing so could leave your ProVal installation in an unstable state since some files may not get updated correctly.
- Uninstall previous versions of ProVal. If you plan to install ProVal to a folder that already contains another version of ProVal, you must go to Add/Remove programs and uninstall the existing version of ProVal (if you’re not sure how to do this, refer to the Uninstalling ProVal section in the document). Alternatively, you can install the new version of ProVal in a different folder.
- Run the ProVal installation program (PVvvv.EXE) and follow the instructions. If possible, we recommend running the installer from the server itself.
- Set up each workstation following the instructions below.
Workstation Setup
- Uninstall previous versions of ProVal. If you plan to install ProVal to a folder that already contains another version of ProVal, you must go to Add/Remove programs and uninstall the existing version of ProVal . If ProVal is not listed in Add/Remove programs you can delete the files in the ProVal folder leaving the ProVal.ini and proval.fon file. Alternatively, you can install the new version of ProVal in a different folder.
- Run the ProVal installation program (PVvvv.EXE) and follow the instructions.
- Edit the ProVal icon on the desktop.
- Right-click in an empty region of the desktop. On the pop-up menu, click New and then click Shortcut.
- In the first dialog box, provide the following as the command line: N:\ProVal\exe where N:\ProVal is the drive and path of the network ProVal directory.
- Click Next, give “ProVal” as the name for the shortcut, and click Finish. UNC names (i.e., of the form \\server\share\) may be used in place of N:\ProVal and C:\ProVal above.
When ProVal is first run on the workstation the ProVal.ini file will be automatically created in a local directory. After clicking OK you may get an “Unable to locate a valid ProVal License.” Message. Click Edit INI File… and update the LicenseDir= setting (For more details refer to License Server Installation Guide.pdf, located in the ProVal installation folder).
Contact Support
Unable to locate a license
Applies to: ProVal and ProAdmin
Symptom
You’ve installed ProVal/ProAdmin, including the workstation setup if ProVal/ProAdmin is installed on your network, and you’ve double-clicked the ProVal/ProAdmin icon but you get an error message that you are Unable to locate a license by any of these methods.
Solution
If the key is a software key for a License Server:
- Go to the following link on the license server http://localhost:1947/int/devices.html If you see Cloned in red on the screen you will need to contact WinTech Support to repair the software key.
- Check that the license server is on and The WinTech License Service is running
- Check that the LICENSEDIR= parameter in PROVAL.INI file is pointing to the correct folder. Then do a search on the network for PVLIMITS.DAT, PVMSG.DAT and/or PVUSERS.DAT, to check that the folder does in fact contain license server files.
- Check that the user has read/write access to this folder.
- Make sure that PVUSERS.DAT was created and exists in the license directory. (If this is the problem, the error message probably offered you an opportunity to create PVUSERS.DAT.)
- If you have just one license, maybe a session was stranded; go into ProVal/ProAdmin from the license server and kill the session to release the key.
- If you’ve gotten to this step, let’s make sure the key is a license server (PVLS) key, not a single-user hardware key. (If you give WinTech the key’s serial #, we’ll check our records.)
If the key is a single user software key:
- Go to the following link on your PC http://localhost:1947/int/features.html check to make sure the license key exists and has not expired(You should see a Key ID and Product and an expiration date under Restrictions).
- Go to the following link on your PC http://localhost:1947/int/devices.html If you see Cloned in red on the screen you will need to contact WinTech Support to repair the software key.
If the key is a network key plugged into a ProVal License Server:
- Check that the driver for the hardware key is installed correctly using sdmedic.exe. See Running the Sentinel SuperPro Medic below.
- Check that the key is plugged into the port on the license server.
- Check that the license server is on and The WinTech License Service is running
- Check that the LICENSEDIR= parameter in PROVAL.INI file is pointing to the correct folder. Then do a search on the network for PVLIMITS.DAT, PVMSG.DAT and/or PVUSERS.DAT, to check that the folder does in fact contain license server files.
- Check that the user has read/write access to this folder.
- Make sure that PVUSERS.DAT was created and exists in the license directory. (If this is the problem, the error message probably offered you an opportunity to create PVUSERS.DAT.)
- If you have just one license, maybe a ProVal session was stranded; go into ProVal from the license server and kill the session to release the key.
- If you’ve gotten to this step, let’s make sure the key is a license server (PVLS) key, not a single-user hardware key. (If you give WinTech the key’s serial #, we’ll check our records.)
Running the Sentinel SuperPro Medic
In order for Windows to recognize your hardware key, the Sentinel System driver must be installed. Typically. Where possible, if you suspect that ProVal/ProAdmin is having a problem interfacing with the attached key, you should first test the key on another computer to determine if it is a problem with the key or a problem with your computer. If the key turns out to be OK, you should determine whether Windows is able to communicate successfully with your key. To do so, install the Sentinel SuperPro Medic program by running Sdmedic.exe from the Software’s installation folder. Follow the program wizard’s instructions for installing the program. Click on the Find SuperPro button and check to see if no Superpro keys were detected.
Cause
ProVal cannot find a License.
Contact Support
License Server Installation Guide
Applies to: ProVal and ProAdmin
The ProVal/ProAdmin License Server (PVLS) brokers ProVal/ProAdmin licenses to users. PVLS allows any number of users to share a given number of licenses as long as it is not at the same time. PVLS keeps track of the number and type of licenses that are available as users check out licenses and check them back in.
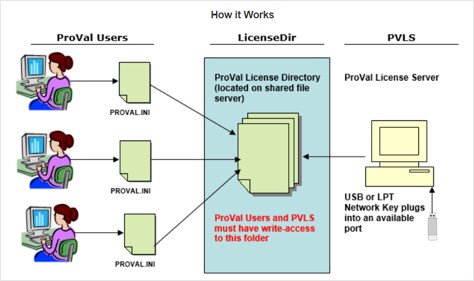
All ProVal or ProAdmin users have individual PROVAL.INI or PROADMIN.INI files that store their configuration settings. One of these settings, LicenseDir, points to a folder which contains files that are written to by both users and PVLS. That is why it is mandatory for all users and the License Server to have write access to the LicenseDir folder.
Pre-Installation Procedure
License Server Operating Modes
The ProVal/ProAdmin License Server may be run as a Windows Service or as a Windows Application.
- Running the License Server as a Windows Service typically offers greater security since there is no need to remain logged in to the system during operation.
License Server Checklist
Before you begin setting up your license server, you must have:
- A machine that is to be designated the license server. Refer to Appendix A for system requirements.
- A USB network key which plugs into an available port in the license server machine. Single user hardware keys CANNOT be interchanged with network keys. If you want to move from one licensing mode to the other, please contact sales@winklevoss.com.
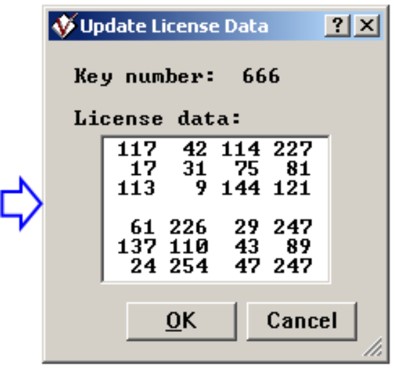
- License data (typically comprising eight rows and four columns of numbers) provided by WinTech. This license data updates the number of licenses, types of licenses and expiration date and is required for the PVLS to function.
Installing as a Windows Service or Application
- Install ProVal or ProAdmin on the PVLS machine: Follow the Installation instructions (readme.doc) to install on the designated PVLS machine.
- Create a Working Directory (typically, this would be C:\PROVAL or C:\PROADMIN).
- Copy the following files from the ProVal/ProAdmin installation folder into the Working Directory (from Step a):
- WinTechService.exe
- WinTechService.License.ini
- ProVal.ini OR ProAdmin.ini
- LicenseUnreg.bat
- LicenseReg.bat
- Define the License Server data file directory (LicenseDir): Create a folder either located physically on the license server or on a common file server to store the License Server data files e.g. C:\PVLS. All users as well as the license server account MUST have write access to this folder. This folder is known as LicenseDir. WinTech recommends that the LicenseDir folder NOT be the same as the ProVal/ProAdmin application folder.
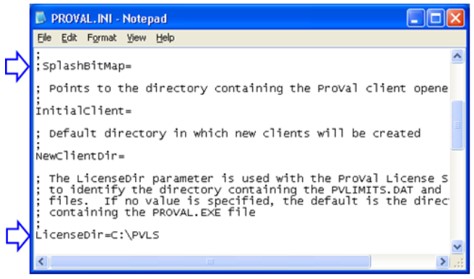
- Edit the following parameters in the PROVAL.INI or PROADMIN.INI file:
- Under the [Config] section, comment out the SplashBitMap setting using a semicolon (;).
- Update the LicenseDir setting in the PROVAL.INI or PROADMIN.INIfile to point to the License Server data file folder defined in Step 2 above.
NOTE: Use UNC (i.e., of the form \\server\share\) to refer to network paths when installing as a Service – mapped drives are not acceptable.
(Typically PROVAL.INI for ProVal installs or PROADMIN.INI for ProAdmin installs)
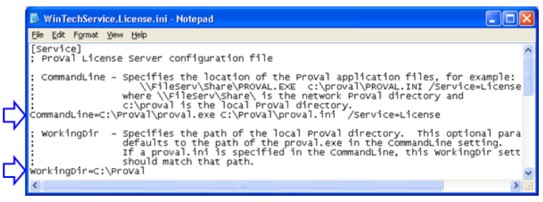
- Edit the necessary parameters in the WinTechService.License.ini file:
- CommandLine: The first parameter should have a fully qualified path to the PROVAL.EXE or PROADMIN.INI file within the ProVal or ProAdmin installation folder and the second parameter must have a fully qualified path to the PROVAL.INI or PROADMIN.INI file.
- WorkingDir: This must be set to the directory containing the local proval.ini or proadmin.ini file (refer to step #1).
- The rest of the settings should not be touched in ordinary circumstances.
(Typically WinTechService.License.INI)
Preparing the License Server Data Files
Plug in the key: At this point, plug the Network Key into an appropriate port on the license server. Inspect the server carefully and unplug any other attached network or single-use keys.
NOTE: Additional keys can interfere with the operation of the License Server.
Start ProVal/ProAdmin and navigate to File > License Manager. Click the “Limits” button and then the “Update” button. Enter the supplied license data codes as shown below (you will receive this in the cover letter with your license key or via e-mail). Click ‘OK’ to exit.
Registering and Starting the License Server
Up to this point all setup has been identical whether PVLS was to be run as a Windows Service or an Application. The following steps will now vary based on running as a Service or Application.
Registering the License Server
The License Server must first be registered. The LicenseReg.Bat script performs this registration function. The contents of this file are very simple. By default it looks like:
WinTechService.exe License /Reg
The value following the /, in this case /Reg, determines whether PVLS will be registered as an application, a Service or both. The possible values are:
/Reg registers both
/RegServ registers only the Service
/RegApp registers only the Application
NOTE: This registers, but does not start, the License Server.
Running PVLS as a Service
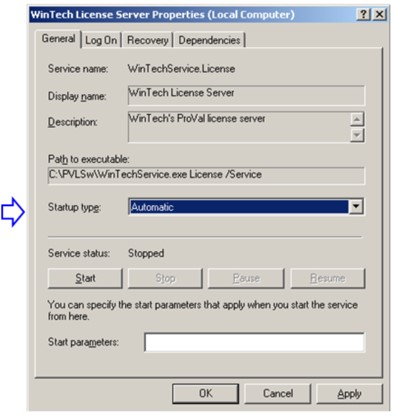
- If the License Server is to be run as a Windows Service, navigate to your list of Services and locate the “WinTech License Server” service. Double-click on it to open up its properties and change the Startup Type to “Automatic” (by default it is “Manual”), which ensures that the Service is started automatically every time the License Server machine restarts.
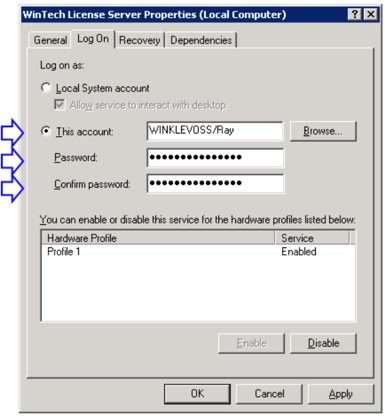
- In most cases, you will need to configure the Service to use a log on that has write access to the LicenseDir folder. Select the “Log On” tab and modify the “Log On As” setting with a fully-qualified username and password as shown below:
- To start the Service, select the “General” tab and click the “Start” button. Check the Microsoft Windows Event Viewer to ensure that the service is functional.
NOTE: Noteworthy events and handy troubleshooting information for the Service may be viewed in the Windows Event Viewer under the Application Log.
Running PVLS as an Application
To start the License Server (as an Application), click Start → Programs → WinTech → License Server → Start License Server. If everything has been installed correctly, you should see the License Server icon on the system tray, with an information balloon reporting license server details as shown:
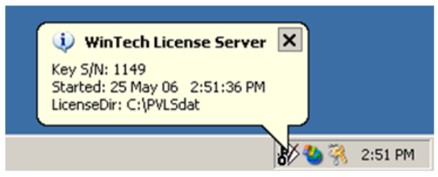
NOTE: You may put the Start License Server entry into the StartUp folder, if you wish to ensure that the License Server starts automatically every time a user logs in.
Uninstalling the License Server System
Follow the following steps to uninstall the License Server:
- Ensure that all ProVal/ProAdmin workstations are disconnected from the License Server.
- Locate the working directory, (C:\PROVAL or C:\PROADMIN in the examples above). Run the “LicenseUnreg.bat” by double-clicking on it.
- This will uninstall the License Server regardless of whether the PVLS was set up as a Service or an Application.
Workstation Configuration
- If it hasn’t been done already, install ProVal or ProAdmin on the workstation: Follow the Installation instructions (readme.doc) to install ProVal or ProAdmin.
- If it is not already created, create a share to the License Data folder.
NOTE: All users must have write-access permissions to this License Data folder.
- In the PROVAL.INI or PROADMIN.INI files for EACH workstation, set the LicenseDir with the License Data Folder share as shown below.

License Server Unavailability
ProVal/ProAdmin workstations are able to detect whether the License Server is available or not. If no sources for licenses are detected at startup, users will see this message:
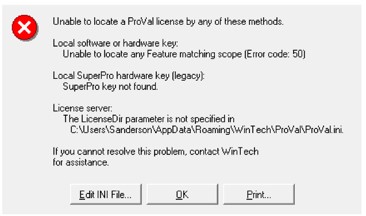
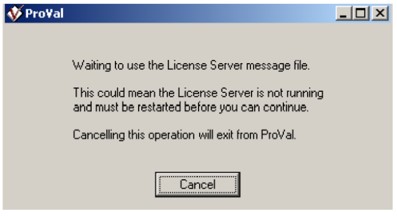
If the presence of a license server has been established, a license has been checked out and subsequently, the license server becomes unavailable, users may receive the following message.
Appendix A: License Server System Requirements
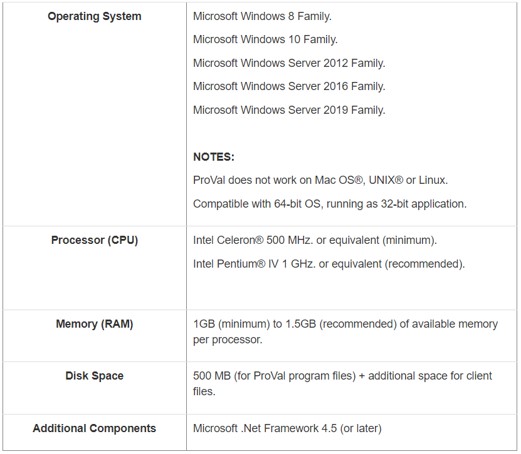
Minimum Requirements
Contact Support
Error 1720 During Installation
Applies to: ProVal and ProAdmin
Symptom
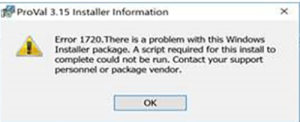
When installing ProVal you get a 1720 error and the install fails.
Solution
Delete the following folder and try the install again C:\Users\%username%\AppData\Local\VirtualStore\Program Files (x86)\WinTech
Cause
A virtual copy of the previous ProVal installation was created by windows and needs to be deleted before installing a new version of ProVal.
Contact Support
Understanding License Errors
Applies to: ProVal and ProAdmin
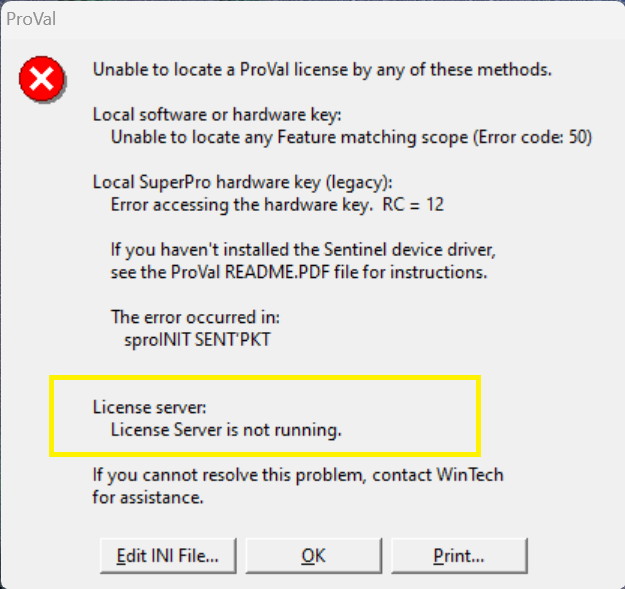
Error 1
License Server is not running.
Solution
On the License Server, verify the status of the WinTech License service.
- If the service is stopped, attempt to start it.
- If the service is already running, stop it and then start it again.
Cause
The WinTech License service has stopped unexpectedly. This may be due to a crash.
Error 2
The LicenseDir parameter (\\XXXXXXX\PVLS) does not specify a valid directory
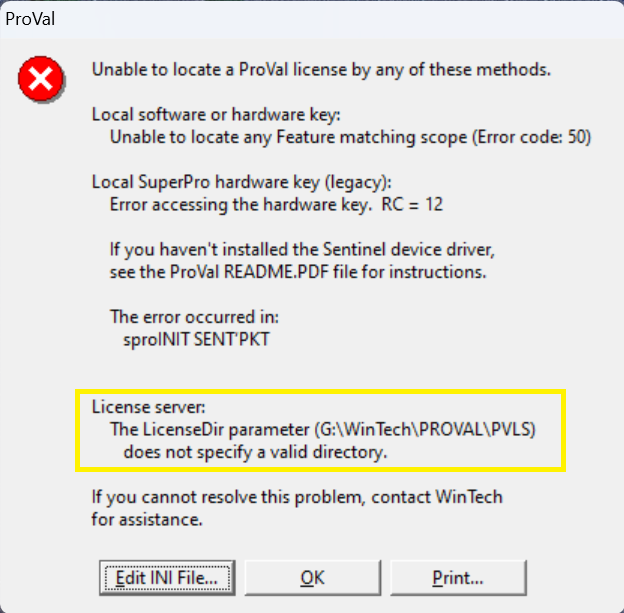
Solution
If a user is unable to access ProVal, check the following:
- Network Access: If the user is connecting remotely, confirm they are connected to the company VPN.
- File Permissions: Ensure the user has read and write permissions to the folder containing the ProVal license file.
- Directory Path: Verify that the ProVal software is pointing to the correct location of the license directory.
Cause
The user is unable to access the ProVal license directory.
Contact Support
Back Office Support
Our technical resources are available to software licensees to support your client work.
Our fees are based on time and expense.
ProVal
Forecasting boot ups. Investment consultancies may not maintain the actuarial expertise needed to develop the liability model for a forecast. Our team can replicate another actuary’s valuation and prepare an initial deterministic forecast. The process requires the latest valuation report and census data and typically takes 4-6 weeks.
Capital market simulations. Consultancies may not maintain the expertise needed to calibrate a capital market simulation for a stochastic forecast. Our team can complete a simulation, according to your parameters, or assist you in your efforts.
Valuation conversions. Although we don’t offer end-to-end conversions, our team includes significant experience with conversions and can develop an overall strategy with respect to converting your book of business from a legacy system.
ProAdmin
ProAdmin boot ups. We realize that sometimes you need a little help in meeting your client deliverables. Our team can assist you in getting plans “booted up” on ProAdmin. We require the plan document, summary plan document (SPD), and sample calculations to assess the effort. After our review we will provide you with a statement of work (SOW) detailing the coding timeframe and associated costs.
SimMetric
Forecasting boot ups. We will boot up your Fund’s investment and spending policies and, assuming you provide your capital market assumptions, will prepare a capital market simulation -- at no charge.
Please contact
+1 203 861 5540 or support@winklevoss.com for more information.