When authoring a Report Writer Template, you’ll need to replace each data item in the template document (i.e., number, date, and character string) with a Form Field that refers to a data item in the Report Writer. This article describes how to:
-
Use the Report Writer’s Insert Field feature.
-
(Optional) Edit a Form Field manually to calculate a derived value (negate the value, add two values together, take the maximum of two values, etc.) or change the formatting style.
-
Tell ProVal to automatically delete a row or column from a Word table after publishing when the row has no values.
In the Report Writer, you can right-click to Insert Field while viewing User-Defined Data, Asset Data, Valuation Sets, Deterministic Forecasts, Gain/Loss Analysis, or Descriptive Statistics. First, switch to Word and position the insertion point of your Word template document where you want the new field inserted. Then:
-
Switch to the Report Writer.
-
Select the value (or values) you want inserted.
-
Right-click and select the format you want.
-
The Report Writer will insert a field (or fields) in the Template Document with the proper field spec.
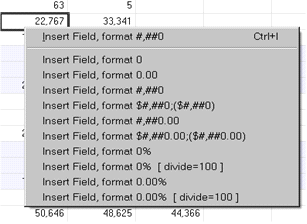
If you are willing to accept the default format (the first one) you may use the keyboard shortcut Ctrl+I.
Note regarding percentages: If you use any format that contains a percent symbol, Word will automatically scale the number up by a factor of 100, in the same way that Excel does if you click the "%" button on the Excel formatting toolbar. For example, if you have a decimal value of 0.065 and choose a format of "0.00%" then Word will show "6.50%" in your document. However, if you have a percentage value of 51.2 (meaning 51.2% female, for instance) and you use a format string of "0.00%", Word will show "5120.00%". In this situation, choose one of the formats with the "divide=100" option. Report Writer will divide your number by 100 before passing it to Word; Word will then scale it up by 100 and add the percent symbol, so you will see "51.20%" in your document.
Inserting multiple fields at once is useful for tabular data, such as active age/service scatter charts and inactive counts and benefits. However, to insert multiple fields at once, we recommend that you do not place the insertion point in a Word table. Rather:
-
Start by placing the insertion point on a blank line.
-
Then, insert the fields with the Report Writer (fields on the same line will be separated by tabs; those on different lines will be separated by paragraph marks).
-
Finally, select the new lines of fields and use Word’s Convert Text to Table feature to create a table.
Editing a Form Field manually (optional)
After inserting a Form Field, it might be useful to edit it manually. For example, to calculate a derived value (negate the value, add two values together, take the maximum of two values, etc.) or change the formatting style. To get started:
-
Switch applications to Microsoft Word (use the Windows taskbar, or press Alt+Tab). Note that the Template Document should already be open if you are running the Report Writer and have selected the “Operate as the Template Document Author” option. If not, open it.
-
Make sure that the Forms toolbar is displayed: on the View menu, click Toolbars and then make sure the Forms toolbar is selected.
-
You may wish to turn on the Form Field Shading feature, which makes form fields easier to see in your document. Click the
 button on the Forms toolbar. If you have more than one document open, be sure that the active document is your template document. (Use the Window menu, or press Ctrl+F6.)
Then, for each form field:
-
Double-click the field (or right-click and choose Properties from the context menu) to bring up the Options dialog box. You can change:
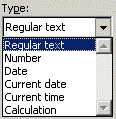
Type. Most fields will be Number. Use Regular Text for something like the actuary's name. Use Date for dates such as the valuation date.
Format. The choices here depend on the field type you chose.
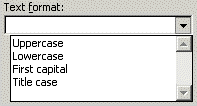
For Regular Text fields, you probably don't need to specify any format. But there are a few choices available:
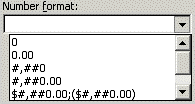
For Number fields, choose the desired format depending on whether you want decimal places, dollar signs, and so on. If the format you want is not shown, you may type in a custom format. Note regarding percentages: If you use any format that contains a percent symbol, Word will automatically scale the number up by a factor of 100, in the same way that Excel does if you click the "%" button on the Excel formatting toolbar. For example, if you have a decimal value of 0.065 and choose a format of "0.00%" then Word will show "6.50%" in your document. However, if you have a percentage value of 51.2 (meaning 51.2% female, for instance) and you use a format string of "0.00%", Word will show "5120.00%". The Report Writer has a way to correct this with its DIVIDE=100 option, which is explained above.
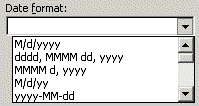
For Date fields, choose the desired format.
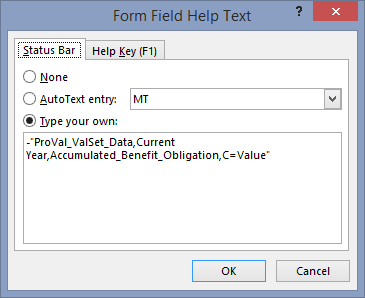
Field specs. The "field spec" that tells Report Writer what data item you want, or the formula to derive a value (the example below negates the value of the ABO). The field spec is entered as the Form Field's help text -- click the Add Help Text button to edit. See Templates: Form Field Reference for the syntax. Note that at this point Report Writer has no idea whether your field spec is valid. It's not until you Publish a document that the fields are verified.
-
Click OK twice and you're done.
Delete a row or column from a Word table
A template document may include values that are not applicable to all clients that wish to use the template. For example, when looking at a breakdown of liability by status, some clients may wish to show a line for disabled participants and others may not. By inserting the {DELROWIFZERO} on the row in the table, after publishing the document, ProVal will delete the tagged row if it only finds 0s or blanks. If ProVal finds values, it will delete the key word.
The key word {DELCOLIFZERO} will delete a column upon publishing if the column only contains blanks or 0s. When using {DELCOLIFZERO}, to avoid Word adjusting column widths to accommodate the key word, it may be useful to put the keyword as the last word in the column title and adjust the font on the key word to a very small size. (If you put the keyword first and adjust the column size, the wrong column size may be used in the title upon publishing).
Note that neither {DELROWIFZERO} or {DELCOLIFZERO} are supported when there is a merged cell anywhere in the Word table.
Example:
The template document set up below will delete the rows for any class of participants that have a 0 or missing value. This example shows one column of values. If multiple columns were shown, all columns would have to be 0 or blank for the row to be deleted.
After publishing the document, it might look like this:
