ProVal’s Report Writer lets you create valuation reports, executive summaries, disclosure letters, etc. by merging ProVal results and other supplemental data into a Template Document prepared in Microsoft Word. Template Documents are generally authored by a single person in your organization. This article describes how to author templates.
You’ll probably want separate templates for documents that are drastically different: valuation reports for U.S. single employer, U.S. Multiemployer, and Retiree Medical plans; Disclosure under ASC 715 and IAS 19; Executive Summaries; etc. Minor variations can often be handled within a single template, by letting users exclude sections which are irrelevant to their case.
For each template, you should do the following. For details, click the link or scroll down.
-
Set up an Access Database (*.mdb, *.accdb) with a sample Report Definition corresponding to the Template Document.
-
Set up a Template Document (*.doc, *.docx) in Microsoft Word
For your reference, the following sample files are provided in the ProVal installation folder:
-
Access Database: “Sample ReportWriter Database.mdb”
-
Template Document: “Sample ReportWriter.doc”
-
Text Substitution documents: “Sample ReportWriter Funding Methods.doc”, “Sample ReportWriter Plan Provisions.doc”, and “Sample ReportWriter Actuarial Assumptions.doc”
Setting up an Access Database (*.mdb, *.accdb)
The goal is here is provide a sample Report Definition that corresponds to the Template Document (i.e., specifies the data sets and labels, user defined data fields, asset data, etc. that the template needs). This will be distributed to users, along with the Template Document. You should start with a particular Template Document in mind.
-
Save sample results from ProVal to a Microsoft Access Database. The objective here is to have the right number and types of results required for the report -- e.g., 3 years of valuation sets, 1 deterministic forecast, 1 salary distribution from descriptive statistics, etc. Actual values do not matter.
-
In ProVal, view results for Valuation Sets Exhibits, Deterministic Forecasts Exhibits, Gain/loss Analysis, or Descriptive Statistics.
-
Click the File button
-
Type in a filename and choose Access database (*.mdb, *.accdb) as the file type
-
Click the Save button
-
Start the Report Writer and open the Microsoft Access Database you created in step 1.
-
From ProVal’s Tools menu, select Report Writer.
-
From the Report Writer’s File menu, select Open, select the database, and click Open.
-
Click the New button to create a Report Definition and give it a name such as “Sample report definition for Actuarial_ReportPPA.doc”. Then click the Edit button and fill in the details.
-
General > ProVal Data Sets: Add a row for each Data Set (i.e., ProVal results from step 1 above) you’ll need for the report. In each row:
-
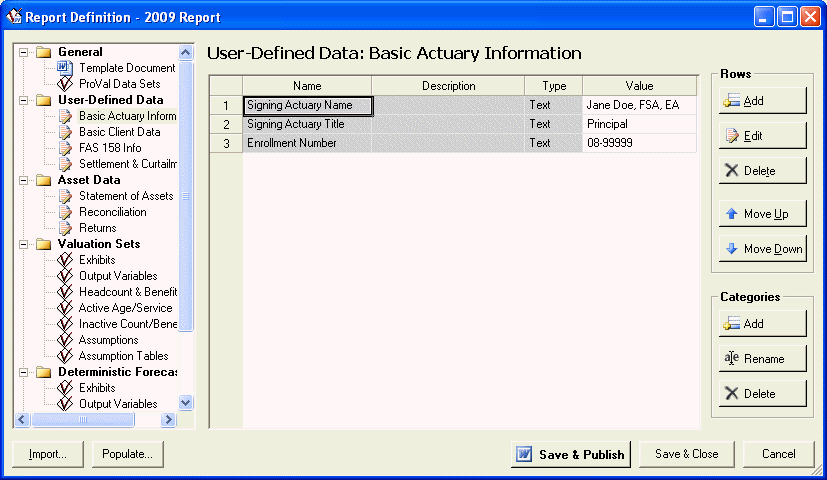
User-Defined Data lets you enter supplemental data that isn’t found in the ProVal Data Sets or Asset Data. You can have as many Data Items as you wish, organized into Categories (e.g., Actuary’s Information, Client Information, etc.). Data items can be numbers, dates, and character strings. The actual data values are not important. You may want to begin by establishing some categories. Category names may be anything you want. Use the Add button on the lower right side to add categories.
-
Asset Data contains customizable information regarding assets to be used in the report.
-
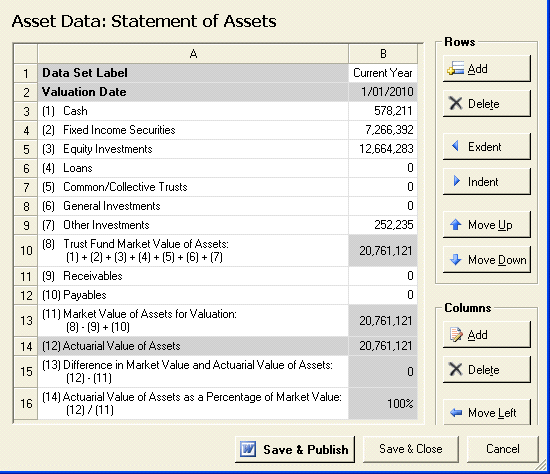
Statement of Assets lets you enter a detailed snapshot of the assets by category (e.g. “Fixed Income”, “Equity Investments”, etc.) on the valuation date. You may customize the categories and the number of valuation dates for historical comparison using the options for Rows and Columns.
-
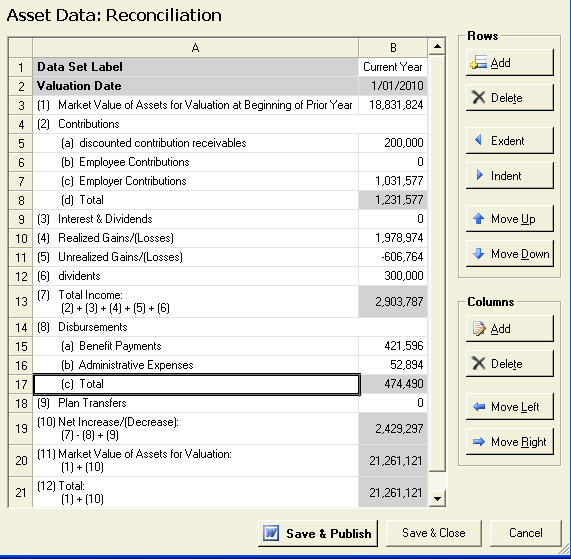
Reconciliation lets you enter the items you wish to display (e.g. “Contributions”, “Interest”, “Disbursements”, etc.) in your report to reconcile the market value of assets from the beginning of the year to the end of the year for each valuation year.
-
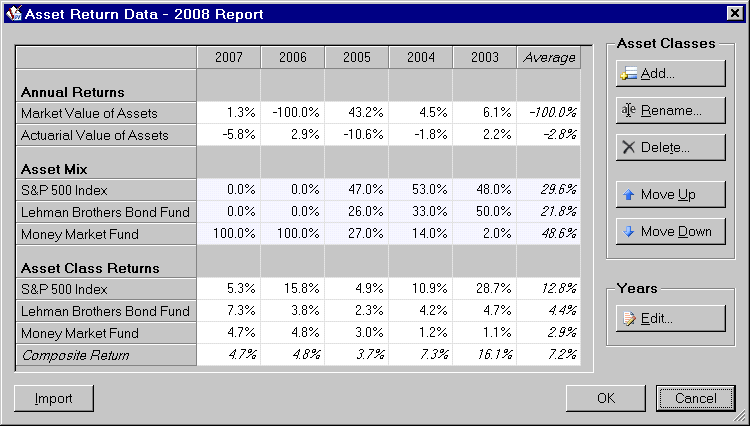
Returns lets you enter historical returns for the plan’s market value of assets, actuarial value of assets, and any number of asset classes (e.g., “Equities”, “Fixed Income”, “Other”, etc.). If your report will rely on these, set up the asset classes and number of years. The actual return values are not important.
-
(Optional) Define derived values. The Report Writer derives a few values that are not found in ProVal (e.g., contribution amount divided by headcount). These values fall into two categories: (1) values that can be computed with values from a data set (e.g., a single valuation set) and (2) values that require multiple data sets (e.g., difference between current year and prior year values). The first type can be added as Queries in the sample database, written in SQL. The latter must be added by programmers at Winklevoss Technologies. Please contact Winklevoss Technologies for further information.
All of the results for a client should be saved into a single database. This includes results for prior years, different scenarios, and even different plans (e.g., hourly pension, salaried pension, retiree medical). However, it is recommended that different clients’ results be saved in different databases.
First specify the Type (i.e., Valuation Set, Deterministic Forecast, Gain & Loss, or Descriptive Statistics).
Then provide a Label e.g., “Current Year”, “Prior Year 1”, “Prior Year 2”, “Baseline”, “Salary Distribution”, etc. These labels will be referred to in the Template Document. It is best to use labels that are not expected to change one year to the next (e.g., “Current Year” is a better label than “Val Year 2008”). Labels may contain any character (including spaces) except commas.
Finally, choose the Data Set (i.e., sample ProVal results saved in step 1. above).
To add a data item, click the Add button under Rows on the right side. The currently selected category will be offered by default, but you may change it if you wish. You must supply a Name; the Description is optional. The Data Type must be Number, Date, or Text. The actual value is not entered here, but rather on the main grid showing all items for the category.
The end result might look something like this:
The dialog box above shows only one category at a time. Click the Show All button to see a list of all your user-defined data items. This list may be sorted by clicking on a column heading.
The end result might look something like this:
You may customize the categories using the options found under the Rows. Indent creates a new subcategory as well as a new Total row, which automatically tallies the new subcategory. You may have up to three levels of indentation. (There is a limit of 16,384 rows at the second level, at which the rows are labeled with alphabetic letters, and 3,999 rows at the third level, at which the rows are labeled with Roman numerals. If you need more rows, create User Defined fields.) Exdent removes a level of indentation and may add or remove Total row(s) as necessary. A Row may be moved Up or Down within its indentation level. Additional categories may be created by Adding rows and they can be removed by Deleting rows. Note that if a row containing subcategories is Deleted, all of the associated subcategories will also be Deleted.
You may customize the number of valuation years to be included for historical comparison by using the options found under the Columns section of the dialog box. Additional valuation years may be created by Adding columns and they can be removed by Deleting columns. The order of the valuation years may be altered by moving columns to the Right or to the Left.
The end result might look something like this:
To do this, click the Edit button and enter the year range that you have data for. Next, click the Add button to add Asset Classes. Finally, enter some sample values. The end result might look something like this:
Setting up a Template Document (*.doc, *.docx)
The goal is here is set up a document that can be used from one year to the next with little (or no) modification. It should also be flexible enough to handle as many different clients as possible.
-
On the Options menu, check the Operate as the Template Document Author option (if it is not checked already). This indicates that you will be editing the Template Document. When this option is checked, each time you work on a Report Definition, the template document will be opened in read/write mode. If your computer has two monitors, we recommend that you position the Report Writer on one screen and Microsoft Word on the other.
-
Set up the Template Document
-
Click the Edit button to edit your sample Report Definition.
-
Click Template Document under the General section. Enter the file path for an existing Microsoft Word document (*.doc or *.docx), ideally an existing report.
-
Replace each data item (i.e., number, date and character string) in the Template Document with a Form Field referring to data from the Report Definition you created in step 3. For more information, see Templates: Inserting Form Fields.
-
Insert Word Bookmarks in the report where you want to give users the option to (a) include/exclude sections of the document or (b) pull in content from other documents (e.g., a summary of plan provisions). For more information see: Templates: Inserting Bookmarks.
-
Insert charts or graphs into the Template Document and replace the underlying data to reference a Form Field. For more information, see: Templates: Inserting Graphs.

-
Validate the Bookmarks and Form Fields that were inserted into the Template Document. For more information, see Templates: Validating Bookmarks and Form Fields.
-
When you are ready to generate a new document by inserting data from your Access database into your template document, click the Save & Publish button. Report Writer will create a new Word document and proceed to
-
Delete any unchecked Report Sections (based on RS_xxx bookmarks);
-
Make any Text Substitutions called for (based on TS_xxx bookmarks);
-
Process all Form Fields, inserting values from the database into the document.
Your template document will not be disturbed -- all changes will be made to a new document, whose name will be something like "Document1".
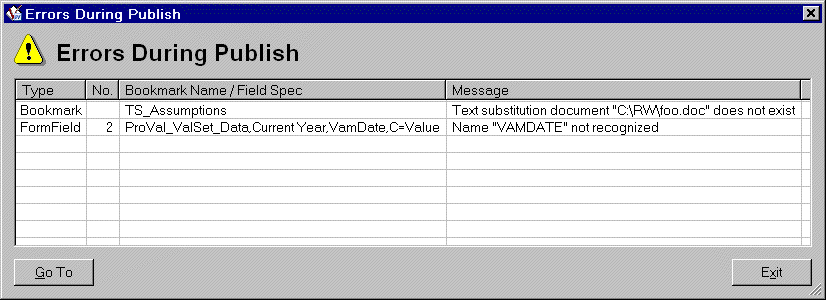
Afterward, if the Report Writer has any trouble, a dialog box will appear with a list of messages.
In this example:
The first error concerns a Text Substitution specification. The definition of TS_Assumptions refers to a document (C:\RW\foo.doc) that does not exist. You will want to return to your Report Writer, click the Text Substitutions button, and correct this.
The second error concerns a field spec. The name 'VamDate' is not recognized. This is most likely a typo and should have been 'ValDate'. You will want to edit your Word template document and edit the field spec in the Form Field help text.
Note the Go To button in the lower-left corner. If you are not sure where the bookmark or form field is located in your document, select a row in the list and then click the Go To button (or just double-click the row). Your Word document will jump to the requested location.
-
Consider deleting the sample Data Sets so that these sample values do not accidentally get included in a report (see the discussion "Managing Results Stored in the Access Database" in the Report Writer article).
-
Distribute the Template Document and corresponding Microsoft Access Database to users. You might do this by copying the .doc and .mdb files to a central location on the network, or alternatively, pushing them to a standard location on each user’s local drive (e.g., c:\documents and settings\{user}\templates). You might also consider maintain a year hierarchy, e.g., \templates\2008, \templates\2009, etc.
