The Data Dictionary is where you describe the data that is used in the calculations. The field names you define will be referenced directly in service & salary calculations, benefit formula components, error & warning messages and output definitions. Besides providing a field name and description for your convenience, the Data Dictionary tells ProAdmin what type of data to expect. The actual mapping of your data to the Data Dictionary fields is done separately: in the Database Linkage for standalone calculations (or Desktop (Access) and Desktop (XML) application types) and in XML Database Linkage for calculations processed through the Server application type.
When you first open up the Data Dictionary selection the library dialog box will be displayed. This library dialog box will show you any data fields that you have previously defined, allow you to add new data fields, hide or unhide data fields, and import data fields from other ProAdmin client files. The library displays the following information Type, Name, Description, and Date Modified. You can click on any heading which will sort the library entries by that field. The first time you click a heading it will sort ascending if you click it again it will resort in descending order.
To add a new data field, click the New button; or, to edit an existing data field, click on the entry. Either action will bring up the Field Attributes window where you set the following information about your data:
Field name: the name by which you will refer to this data when coding your plan. The field name must start with a letter and may contain letters, digits, and underscore, but no spaces or other special characters. The capitalization will be retained, but later use of the field is not case-sensitive.
Description: a phrase of any length further describing the data for reference purposes. All characters are permissible. Remember to include key information about the contents of the field.
Field type: sets the type of data in the field as Numeric, Character or Date. Other options displayed on the dialog box may change as the field type changes, since special parameters are relevant to certain field types.
Formatting style: sets a template for the display format of a numeric field. This style determines the width, number of decimals, and presence of dollar signs and commas. The data itself is retained to full precision regardless of the formatting style.
Date Dependent Array: This box can only be set for numeric fields. When it is checked it indicates that the data is a set of values, each associated with effective date or a start and stop date. Effective date arrays have a single date that indicates the date on and after which the value is in effect. Start/Stop date arrays have two dates which bracket the time period over which the value is effective or was earned. Another feature of arrays is that you can set a Return values selection that will filter the data that is contained in the field to be one of the following: all values, the most recent value, the largest value, or the smallest value contained in the array. If any choice but all values is selected, the data will be returned as a one value array.
Assign Coded Labels checkbox and associated Coded Labels button pertains only to numeric fields. There are some places in ProAdmin where coded fields (i.e., numeric fields with coded labels) are required. These include sex fields, the beneficiary type field (in Census Specifications), and fields that will be referenced to define benefit formula constant or table values “based on a coded field”. For example, if you have a plan with multiple divisions where the benefit formula is virtually identical across the divisions except for the early retirement reduction factors (ERFs), then the ERFs can be defined compactly using a Benefit Formula Component Table where the table referenced varies based on a coded field. The coded field in this case would be a field that indicates what division the participant is in.
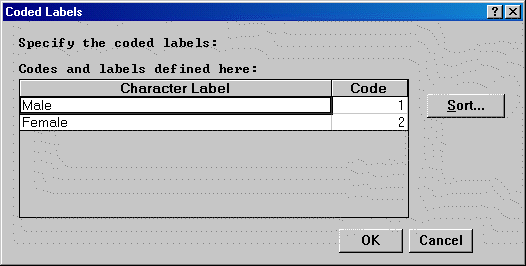
There is no limit to the number of codes and labels that may be defined for a coded field. The character labels consist of character phrases of any length that would be associated with the numeric codes in the data. When these are set up, the system will display the label instead of the code. For example, if a database contains the codes 1 for males and 2 for females in the member sex field, the labels Male and Female would be assigned to the appropriate code as shown below:

If checked, the Display first when reviewing data box indicates that this field is critical for data review. When reviewing data prior to processing a calculation, fields with this parameter checked will be displayed first, in alphabetical order, followed by all other referenced data fields sorted alphabetically. In addition, any fields with this box checked will be the default data fields displayed within the Member Data section of the Calculation Worksheet in the Calculation Results.
In addition to the standard View, Save As New, Erase and Cancel buttons, the Replace button is available to SuperUsers.